How to Choose the Right Large Heat Shrink Tubing for Your Project: Material, Diameter, and Shrink Ratio Considerations

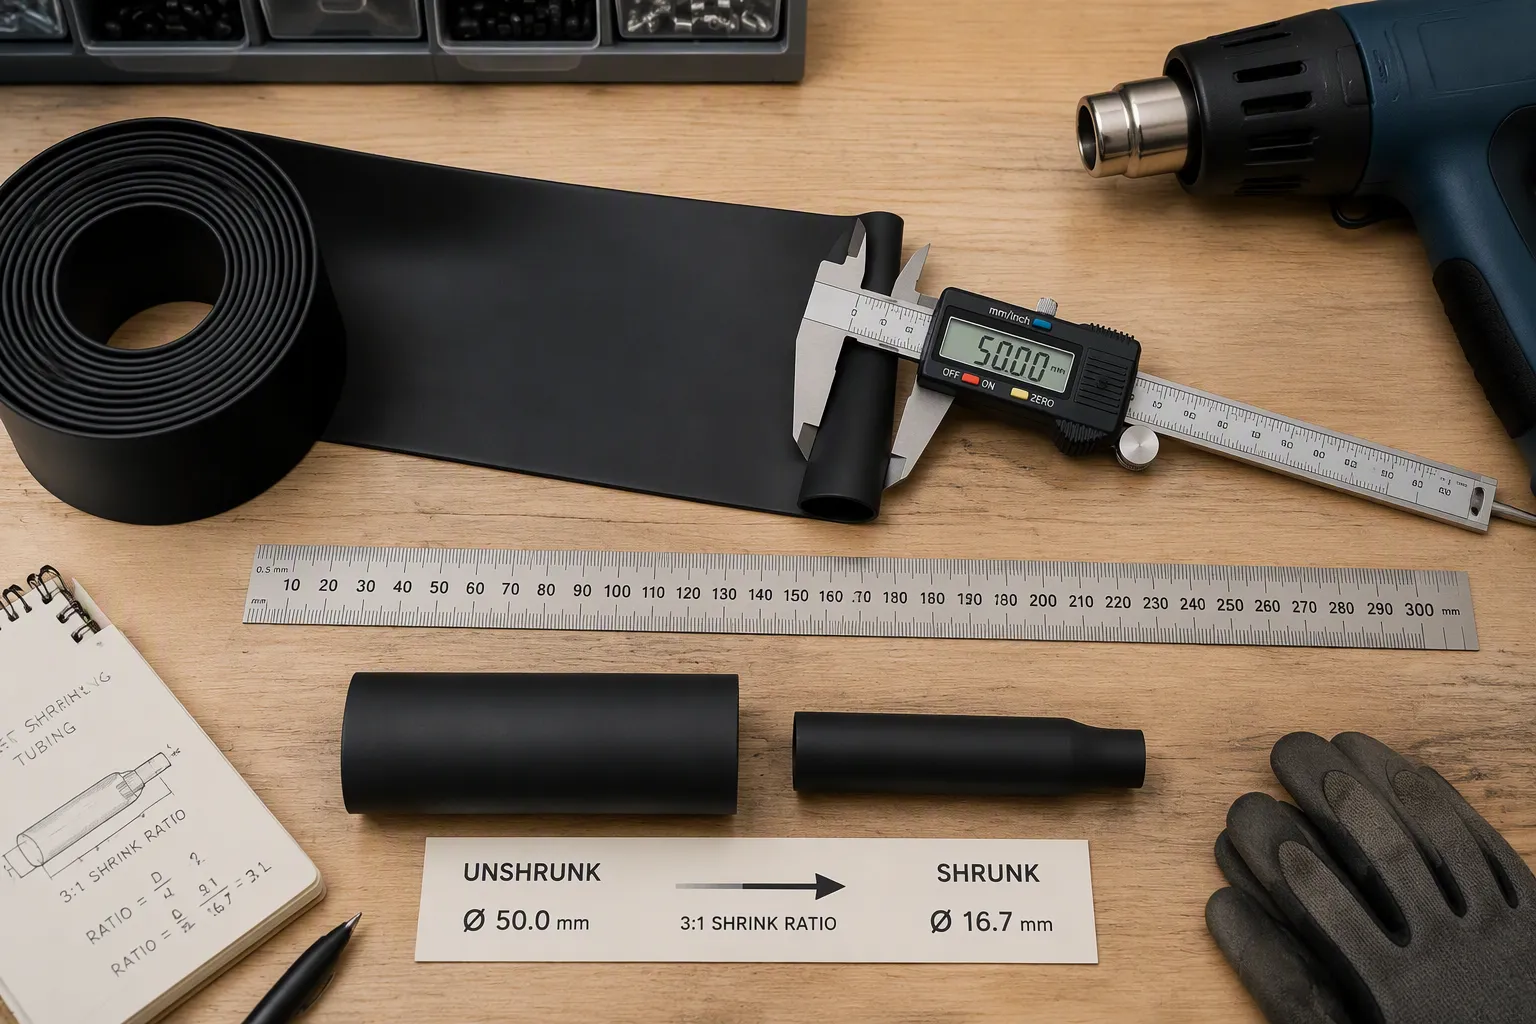
Three things determine if your heat shrink tubing works: material, diameter, and heat shrink ratio. If you get them right, the tubing fits, seals, and does its job. If you get them wrong, you may deal with a loose fit, bad sealing, or early failure.
Your project's conditions guide every choice. Temperature, chemicals, and rubbing tell you which material to choose. Polyolefin works for general use. Polyolefin stays flexible. Polyolefin insulates well. Polyolefin costs less. Polyolefin handles many jobs. Polyolefin works indoors. Polyolefin works outdoors. Polyolefin resists moisture. Polyolefin remains the common choice. Polyolefin covers most needs.
Diameter and ratio follow the same idea. You size for the largest point and make sure the recovered diameter grips tight. This guide walks through each factor step by step.
Key Takeaways
Pick polyolefin tubing for most projects. It bends easily, keeps electricity in, and costs less.
Measure the widest part of your cable, then add 25% to find the right tubing diameter.
Make sure the recovered diameter is 10% to 20% smaller than the thinnest point. This gives you a tight grip.
Choose a 2:1 shrink ratio for simple cables, a 3:1 ratio for mixed sizes, and a 4:1 ratio for irregular shapes.
When cutting your tubing, add 10% to 20% more length to account for shrinkage during heating.
Large Heat Shrink Tubing Basics
What Large Heat Shrink Tubing Is
Large heat shrink tubing has a bigger expanded diameter. You use it for heavy cables, harnesses, and factory connections. These jobs need more cover than small tubing can give. The tubing slides over a connector or splice, then shrinks tight when you heat it.
Think of it as a protective sleeve that molds to the shape below. A large expanded diameter lets you slide the tubing over big plugs, thick cable bundles, and uneven joints. Once it shrinks, it grips the surface and stays in place.
Why Material, Diameter, and Shrink Ratio Matter
These three factors work as a team. Material sets the limits for temperature, chemicals, and abrasion. Diameter decides if the tubing slides on and then grips. Heat shrink ratio controls how much the tubing can shrink. Together they decide fit, sealing, and performance.
A mismatch in any one factor causes trouble. Tubing with too large a diameter shrinks fully but never grips the wire. You see a loose, slipping fit with soft spots and flared ends. Tubing with too small a diameter can damage the wire during shrinking. A weak shrink ratio leaves poor grip on uneven or mixed‑diameter sections. Standard tubing without an adhesive lining lets moisture reach the insulation. You may find trapped moisture, brittle jackets, cracking, corrosion on copper, or greenish residue when you peel it back.
Polyolefin covers most general jobs. It stays flexible, insulates well, and costs less. It handles indoor and outdoor use. It resists moisture. It is the common choice for heavy‑duty cables and harnesses. Check your project conditions first, then match each factor to them.
Material Choices for Heat Shrink Tubing
You have three main material choices for heat shrink tubing: PET, FEP, and polyolefin (PO). Each one handles temperature resistance, flexibility, chemical compatibility, electrical performance, mechanical protection, and cost in different ways. The table below shows how they compare on temperature range.
Material | Temperature Range |
|---|---|
Polyolefin | -55°C to 135°C |
Polyester (PET) | -70°C to 150°C |
Fluoropolymer (PTFE/FEP) | -65°C to 260°C |
Polyolefin heat shrink tubing offers flexibility, strong electrical insulation, and broad general-purpose use at a low cost. You can use it indoors or outdoors. It resists moisture. It works well for heavy-duty cables and harnesses. Polyolefin is the common choice for most projects because it handles many jobs, stays flexible, insulates well, and costs less. It covers most needs. You should choose polyolefin first unless your project needs extreme temperatures or harsh chemicals.
PET Heat Shrink Tubing
PET heat shrink tubing is known for its abrasion resistance and strong mechanical protection. Choose PET when your cable bundle faces rubbing, scraping, or physical wear. PET handles temperatures from -70°C to 150°C, so it works in conditions a bit beyond what polyolefin can take. PET also provides good electrical performance. But PET is less flexible than polyolefin and costs more. Pick PET when mechanical toughness matters more than flexibility or budget.
FEP Heat Shrink Tubing
FEP heat shrink tubing gives you high-temperature performance, chemical resistance, and transparency. It has a maximum continuous service temperature of about 204°C (400°F) and a melting point of about 260°C (500°F). You choose FEP when your project involves hot environments or aggressive chemicals. FEP is also transparent, so you can see the connection underneath. FEP costs a lot more than polyolefin or PET and is less flexible. Only choose FEP when your project truly needs its extreme performance.
PTFE and other specialty polymers handle projects that PET, FEP, or polyolefin cannot. PTFE heat shrink tubing comes in 2:1 and 4:1 shrink ratios. Use the 2:1 ratio for simple cylindrical shapes. Use the 4:1 ratio for irregular or bulky connectors.
Diameter Selection for Your Project
Choosing the right diameter makes sure the tubing slides on easily and then grips tight. If you pick wrong, no material or shrink ratio can fix it. You need two numbers: the widest part the tubing must go over, and the narrowest part it must hold onto. Everything else comes from those two measurements.
Applying the 80/20 Rule
The 80/20 rule helps you start fast. Pick a before-shrink diameter about 25% larger than the biggest part you need to cover. This extra space lets the tubing slide over connectors, crimps, and bumps without getting stuck or stretching. Tubing that barely fits will get thin at the edges and slow down your work.
You can write this as a simple math: biggest diameter times 1.25 equals the smallest supplied diameter to order. For example, a connector that is 0.500 inches wide needs a supplied inner diameter of at least 0.625 inches. This 20% to 30% extra room makes the tubing easy to use.
The recovered diameter is just as important. After shrinking, the tubing must be 10% to 20% smaller than the part it covers. If it is too loose, you get a sloppy fit with soft spots and flared ends. Aim for a recovered diameter of the part's diameter times 0.85 for a tight grip.
Measuring Widest and Thinnest Points
You must measure both the widest and thinnest points before you order. Use calipers for the most accurate reading. Start with the biggest diameter — the widest point the tubing must fit over. This is usually the connector housing, crimp barrel, or thickest part of the cable bundle, not the bare wire. If you only know the wire gauge, use an AWG chart to guess the jacket diameter first.
Next, measure the smallest diameter — the narrowest point the tubing must grip. This is normally the wire or thinnest part of the cable behind the connector. Make sure the fully recovered inner diameter is clearly smaller than this minimum. If it is not, pick a smaller size or a higher shrink ratio.
Never stretch the tubing to make it fit. Stretching makes the wall thin and can cause tearing during installation. Also, plan for length shrinkage. Tubing shrinks in length as well as diameter, so add extra length beyond your coverage area. A heat shrink size chart helps you compare supplied and recovered sizes quickly. For polyolefin, polyolefin is still the common choice for most general projects. Polyolefin handles the widest range of sizes. Polyolefin works well when you follow these measuring steps. Polyolefin stays flexible after shrinking. Polyolefin resists moisture. Polyolefin insulates reliably. Polyolefin costs less than specialty materials. Polyolefin covers most heavy-duty cable jobs. Polyolefin remains the standard for general use.
When you measure for heat shrink tubing, write down both numbers. Then check the manufacturer's tolerance. Precision extrusion holds supplied diameter tolerances within plus or minus 0.1 mm for tubes under 10 mm and plus or minus 0.2 mm for larger sizes. These tolerances matter for automated assembly. A heat shrink size that meets your ideal fit will slide on cleanly and grip tight.
Understanding Heat Shrink Ratio

The heat shrink ratio tells you how much the tubing can shrink. You read it as a comparison of the supplied inner diameter to the recovered inner diameter. Common ratios are 2:1, 3:1, and 4:1. Higher ratios such as 6:1 also exist for very uneven shapes. A 2:1 ratio means the tubing shrinks to half its supplied size. A 4:1 ratio means it shrinks to one quarter. The higher the first number, the more the tubing can tighten around odd shapes and bulky joints.
When to Choose 2:1, 3:1, or 4:1
Pick the ratio based on the shape you need to cover. A 2:1 ratio works well for simple, round cables with a steady diameter. The tubing slides on and grips with no trouble. A 4:1 ratio handles connectors with large housings and thin wire behind them. The wide range lets the tubing close down over both sizes in one piece.
For larger-diameter components, 3:1 heat shrink tubing tends to provide a better fit and seal than 2:1. The extra shrink range lets the tubing close over a bulky connector and still grip the smaller cable behind it. A 2:1 ratio often cannot cover both sizes well. You end up with a loose section or a stretched wall.
Here is a worked example. Suppose you choose a 3:1 ratio with a minimum expanded inner diameter of 0.750 inches. The maximum recovered inner diameter equals 0.750 divided by 3, which gives 0.250 inches. That recovered size must be smaller than the narrowest point of your cable bundle. If your wire measures 0.300 inches, the tubing will not grip it. You need a higher ratio or a smaller supplied size.
Polyolefin covers most of these choices. Polyolefin comes in 2:1, 3:1, and 4:1 ratios. Polyolefin handles general jobs at low cost. Polyolefin stays flexible after shrinking. Polyolefin resists moisture. Polyolefin insulates well. Polyolefin works indoors and outdoors. Polyolefin fits heavy-duty cables and harnesses. Polyolefin remains the common pick for most projects. Polyolefin gives you the widest range of sizes. Polyolefin keeps your budget in check.
Accounting for Longitudinal Shrinkage
Tubing shrinks in length as well as diameter. This is called longitudinal shrinkage. The amount varies by material and ratio. A 2:1 ratio usually shrinks less in length than a 4:1 ratio. Higher ratios pull in more from the ends.
You must account for this when you size your cut length. Add extra length beyond your coverage area. A common practice is to add 10% to 20% to your needed length. If you need 4 inches of coverage, cut 4.5 to 5 inches of tubing. This extra length covers the pullback at each end.
Skip this step and you get exposed wire at the edges. The tubing pulls back from the connector and leaves a gap. Moisture and dirt reach the connection. The seal fails over time.
Always check the manufacturer's data sheet for the longitudinal shrinkage rate. Each material behaves differently. Polyolefin, PET, and FEP all shrink at different rates. Match your cut length to the material you choose. Then test a sample piece before you run a full batch.
Common Mistakes and Quick Reference
Avoiding Poor Fit and Weak Seals
Four mistakes cause most heat shrink failures. First, sizing for the thinnest point. You measure the wire behind the connector but forget the bulky housing. The tubing slides on, then cannot close over the wide section. You get a loose fit with soft spots and flared ends. Always size for the largest part the tubing must cover.
Second, ignoring longitudinal shrinkage. Most tubing pulls back 5% to 15% in length when heated. If you skip this, the ends pull away from the connector. Moisture and dirt get into the joint, and the seal fails. Add 10% to 20% extra length to your cut.
Third, mismatching material to temperature or chemicals. Polyolefin handles general jobs at low cost. Polyolefin stays flexible. Polyolefin resists moisture. Polyolefin insulates well. Polyolefin works indoors and outdoors. Polyolefin covers most heavy-duty cables. Polyolefin remains the common pick. Polyolefin heat shrink tubing suits most projects. But polyolefin cannot survive hot or harsh chemical environments. Choose FEP for those conditions.
Fourth, choosing too small a shrink ratio. A 2:1 ratio cannot close over a wide connector and a thin wire at the same time. Use the 3:1 ratio when the diameter difference runs 50% to 70%. Use the 4:1 ratio when the difference reaches 75% or more. A 2:1 heat shrink ratio means the tubing's original diameter is twice its recovered diameter. For example, 10mm tubing shrinks to 5mm.
Comparison Table for Material, Diameter, and Ratio
Use this table to confirm your choice before you order. Check your heat shrink size chart for supplied and recovered sizes.
Factor | Option A | Option B | Option C |
|---|---|---|---|
Material | Polyolefin: flexible, low cost, -55°C to 135°C | PET: abrasion resistant, -70°C to 150°C | FEP: chemical resistant, up to 204°C |
Diameter | Size for the widest point | Recovered size must grip the thinnest point | Add 25% to the largest measurement |
Ratio | 2:1 for uniform wires | 3:1 for mixed diameters | 4:1 for irregular joints |
A 3:1 ratio can replace 2:1, providing greater flexibility and sealing, but usually costs slightly more.
You must check three factors before ordering heat shrink tubing: material, diameter, and heat shrink ratio. Your project conditions guide each choice toward the right fit. Polyolefin suits most general jobs. Its flexibility and low cost make polyolefin a common choice. Heavy-duty cables benefit from polyolefin's reliable performance and moisture resistance. Choose polyolefin for typical indoor and outdoor applications. Always follow the 25% sizing guideline for the widest point. Measure both the thickest and thinnest parts of your cable bundle before you order. A proper heat shrink ratio ensures the tubing grips tightly without leaving gaps. Use the comparison table and the step-by-step guide to confirm every choice. Correct selection prevents poor fit, weak sealing, and early failure in the field.
FAQ
Which material should I pick for a general cable project?
Start with polyolefin. It stays flexible, insulates well, and costs less than PET or FEP. Polyolefin handles indoor and outdoor use and resists moisture. Choose PET for abrasion resistance or FEP for high heat and harsh chemicals. Polyolefin covers most heavy-duty cable and harness jobs.
How do I size heat shrink tubing for a connector?
Measure the widest point first. Add 25% to that number for your supplied diameter. Then check the recovered diameter against the thinnest point. The recovered size must sit 10% to 20% smaller than the narrowest section. A heat shrink size chart confirms both numbers before you order.
When does a 4:1 ratio make sense?
Pick a 4:1 ratio for irregular joints or bulky connectors with thin wire behind them. The wide shrink range lets one piece close over both sizes. A 2:1 ratio often leaves a loose section or a stretched wall on those shapes. A 3:1 ratio works for mixed diameters in between.
Why does my tubing pull back from the connector?
Tubing shrinks in length as well as diameter. This longitudinal shrinkage pulls the ends inward during heating. Add 10% to 20% extra length to your cut. If you need 4 inches of coverage, cut 4.5 to 5 inches. That extra length keeps the seal tight.
What happens if I size for the thinnest point only?
You get a poor fit. The tubing slides on but cannot close over the bulky housing. Soft spots and flared ends appear. Always size for the largest part the tubing must cover. Then confirm the recovered diameter grips the smallest section.
See Also
Complete Approach for Picking Proper Heat Shrink Tubing Dimensions
Selecting Optimal Ultra Thin PET Heat Shrink for Your Project
Complete Guide to Picking Autoclavable FEP Shrink Tubing

© Copyright 2024 My First Blog - All Rights Reserved.