Step-by-Step Guide to Applying Thin-Wall PET Heat Shrink on Endoscope Wires

You need reliable insulation and protection when working with medical device wires. Using Thin-Wall PET Heat Shrink for Endoscope Wiring keeps the wires compact and helps maintain a lightweight device. Medical imaging performs best when heat shrink tubing is applied correctly. For instance, the table below demonstrates how Thin-Wall PET Heat Shrink for Endoscope Wiring helps preserve signal clarity and reduces stray light—both critical factors for medical devices.
Parameter / Feature | Value / Description |
|---|---|
Outer diameter with PET heat shrink | ~0.8 mm |
Signal-to-noise ratio (SNR) | 15,000 |
Protective envelope material | PET heat shrink tubing |
Background noise reduction method | Blackened PET heat shrink tubing |
You can apply Thin-Wall PET Heat Shrink for Endoscope Wiring to your device wires by following the proper steps. This approach works whether you’re in a medical lab or assembling a catheter at home.
Key Takeaways
Pick PET heat shrink tubing that is about 25% bigger than your wire bundle. This helps the tubing fit tightly and keeps the wires safe.
Always clean and check the wires before you put on the tubing. This stops damage and makes sure the device is safe.
Use a heat gun at the right temperature, between 70 and 190°C. Move the heat around the device as you turn it. This helps the tubing shrink smoothly with no bubbles or wrinkles.
Try the axial tension technique by gently pulling the tubing while you heat it. This makes the tubing tight and gives a slim, neat finish. It also keeps the device flexible.
Look at the tubing after shrinking to see if it covers everything evenly. Make sure it fits tight and has no cracks. Test if it bends well and is strong to make sure it will last a long time.
Materials and Tools
Required Materials
You need the right materials to use PET heat shrink tubing safely. PET heat shrink tubing is strong and thin. It gives good insulation for wires. It follows important rules like UL/CSA 224 and AMS-DTL-23053. These rules make sure the tubing keeps wires safe and works well after cleaning. The tubing can be very small or a bit bigger. It can be as thin as 0.0001 inches. You can use it for endoscope wires or catheter assemblies. PET heat shrink tubing is safe for the body, which is important for medical use.
Material Characteristic | Specification / Value | Test Method / Standard |
|---|---|---|
Wall Thickness | 0.045 - 0.125 mm | Digimatic Micrometer |
Tensile Strength | ≥ 30 MPa | ASTM D638 |
Elongation at Break | ≥ 200% | ASTM D638 |
Surface Resistivity | ≥ 1×10^9 Ω·cm | GB/T 1410 |
Volume Resistivity | ≥ 1×10^14 Ω·cm | GB/T 1410 |
Melting Point | ≥ 220°C | DSC |
Shrinkage Rate (Lateral) | 48 ± 4% | Laboratory Water Bath |
Shrinkage Rate (Longitudinal) | 8 ± 3% | Laboratory Water Bath |
Long-term Use Temperature | -25 to 120°C | Oven |
Short-term Use Temperature | < 200°C | Oven |
Shrinking Temperature | 70–190°C | Shrink Furnace |
Biocompatibility | Passed ISO 10993 cytotoxicity, skin sensitization, intradermal irritation, acute toxicity tests | ISO 10993 |
Tools Checklist
You need some tools to work with PET heat shrink tubing:
Use sharp scissors or a blade to cut the tubing.
Use a heat gun or hot air torch to shrink the tubing.
Tweezers or forceps help you hold small wires and tubing.
A digital micrometer checks the size of the tubing.
Wear clean gloves to keep things germ-free.
Use sterile wipes to clean wires before you start.
A heat gun or torch helps you get the right temperature. The best shrinking temperature is between 70°C and 190°C. This makes the tubing fit tightly around the wires.
Safety Tips
⚠️ Always follow safety rules when using PET heat shrink tubing for medical devices.
Wear gloves and use clean tools to keep your work area clean.
Make sure all materials are safe for the body, like ISO 10993 and USP Class VI.
Only use tubing that is FDA-approved and made under ISO 13485 rules.
Check that the tubing can handle cleaning methods like autoclaving or gamma radiation.
Work in a clean place so the device does not get dirty.
Keep records of the materials you use for safety and quality.
These steps help keep you and the patient safe. They also make sure the device follows all medical rules.
Select Thin-Wall PET Heat Shrink for Endoscope Wiring
Tubing Size and Shrink Ratio
Picking the right size PET heat shrink tubing is very important. The tubing should be about 25% bigger than your wire bundle. This makes it easy to slide the tubing over the wires. When you heat it, the tubing shrinks and fits tightly. This gives strong protection to the wires. Thin-wall PET heat shrink is very thin but also strong. It helps keep your device light and easy to move. If you need more sealing, you can use adhesive-lined or twin-wall tubing. These types help keep out water and moisture.
Thin-wall PET heat shrink tubing is better than thick tubing or other materials. It can handle high heat and protects against wear. It also gives great electrical insulation. The thin wall lets the tubing fit closely and helps protect delicate wires. This is very important when making medical devices like endoscopes and catheters.
Material Compatibility
You need to make sure the PET heat shrink tubing works for your device. PET tubing can be cleaned with many methods, like gamma rays, ethylene oxide, steam, or dry heat. This makes it safe for medical use. PET tubing does not get damaged by chemicals and stays flexible after cleaning. Always check that the tubing meets biocompatibility rules. This keeps patients safe and stops skin problems.
Tip: Always check if the tubing is phthalate-free and uses USP Class VI-certified pigments. This lowers the chance of patient reactions.
Sourcing Quality Tubing
Getting good quality tubing is very important for medical devices. You should buy PET heat shrink tubing from trusted companies. Look for tubing that meets strict quality rules:
Quality Assurance Metric | Details and Requirements |
|---|---|
Dimensional Tolerances | Diameter tolerances: ±0.001" for small sizes, ±5% for larger sizes; Wall thickness tolerances: ±0.0001" to ±20% depending on application |
Biocompatibility Standards | Compliance with ISO 10993-5 (cytotoxicity limits), ISO 10993-10 (irritation thresholds), and MDR 2023 leachable testing |
Electrical Properties | Dielectric strength greater than 4,000 V/mil; volume resistivity around 10^18 Ohm-cm |
Sterilization Compatibility | Must withstand ethylene oxide, gamma radiation, autoclaving, hydrogen peroxide plasma, and e-beam sterilization without degradation |
Heat Shrink Process Parameters | Recommended shrinking temperature around 150°C; controlled heat application to ensure uniform shrinkage and avoid defects |
Visual Inspection | Inspection for defects such as air bubbles, uneven shrinkage, and misalignment; transparency aids alignment verification |
Manufacturing Environment | Cleanroom conditions with HEPA filtration and protective protocols to prevent contamination |
Calibration and Quality Control | Regular calibration of measurement tools (calipers, micrometers) to maintain accuracy |
Here are some steps to help you get good tubing:
Keep your work area clean and controlled.
Use the right amount of heat for even shrinking.
Check the tubing for bubbles, bad shrinking, or if it is not straight.
Make sure your measuring tools are checked often.
Test that the tubing can be cleaned many ways and still stay strong and flexible.
By picking the right size and buying good PET heat shrink tubing, your device will meet high standards. This keeps the device safe, flexible, and reliable for endoscopes and catheters.
Prepare Endoscope Wires
Clean and Inspect
Start by making sure the wires are clean. Use alcohol pads or sterile wipes to wipe off dust and oil. This keeps your device from getting dirty. Always put on gloves to protect yourself and the wires. Look at each wire closely for any damage. Check if there are any cuts, bends, or broken parts. If you see a problem, use a new wire. Clean wires help you follow medical rules.
Tip: Cleaning wires lets you find problems early. This saves time and keeps patients safe.
Align and Bundle
Once the wires are clean, line them up straight. Put them on a clean table or mat. If the wires are tiny, use tweezers or forceps to help. Group the wires in the order you need for your project. Make sure the wires do not cross or twist together. Use a small piece of tape to hold them in place. This makes the next steps easier and helps you avoid mistakes.
Step | Action | Purpose |
|---|---|---|
1 | Lay wires flat | Stop wires from tangling |
2 | Group by function | Make assembly simple |
3 | Secure with tape | Keep bundle together |
Pre-Application Steps
Before you put on the PET heat shrink tubing, measure how much you need. Cut the tubing a little longer than the wires. This gives you extra space if you need it. Check that the tubing fits over the wires. If you use adhesive-lined tubing, get it ready now. Make sure your work area is clean and has no dust. Keeping things clean is very important for medical devices. This helps you meet safety and cleaning rules. When you do these steps, your device will be ready for the next part.
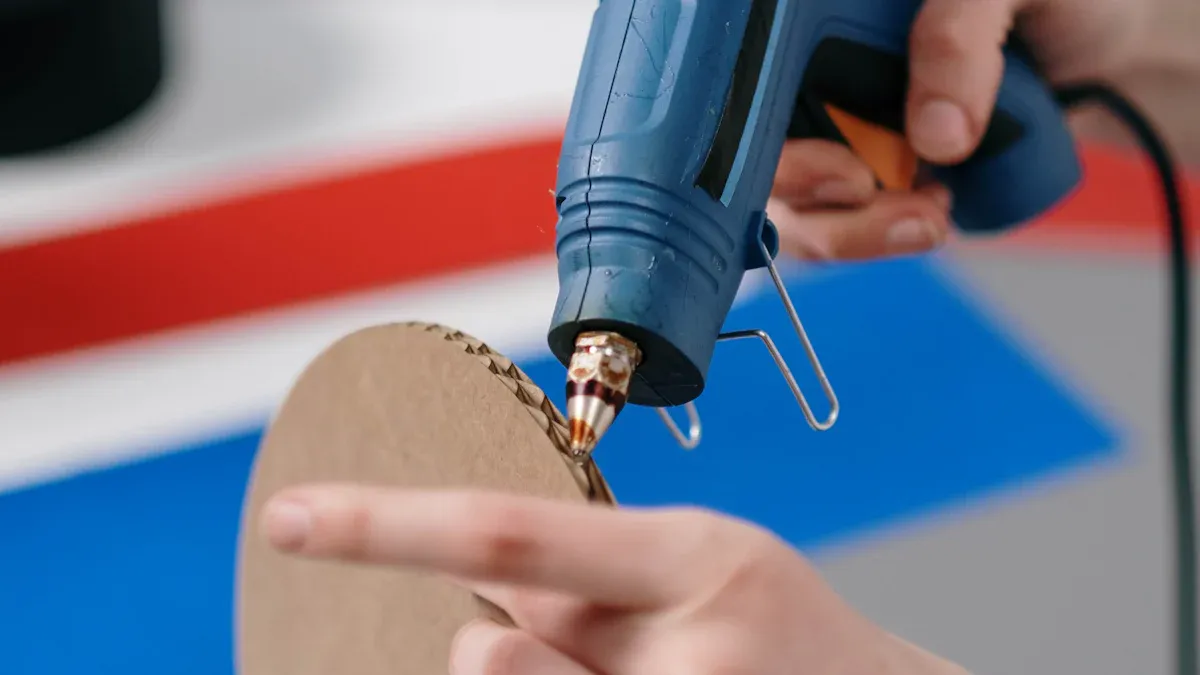
Step-by-Step Guide to Applying PET Heat Shrink Tubing
Cut and Position Tubing
Start by measuring the length of heat shrink tubing you need for your device. Use sharp scissors or a blade to cut the tubing. Make sure the cut is straight. This helps the tubing fit better and look neat. Slide the tubing over the endoscope wires. The tubing should cover the area you want to protect, with a little extra on each end. Check that the tubing sits flat and does not bunch up. Good positioning helps you avoid gaps and wrinkles later.
Tip: Always double-check the tubing size before you start. The right size gives a snug fit and keeps your device safe.
Applying Heat for Uniform Shrinkage
You need to use a heat gun or hot-air torch for this step. Set the temperature below 100°C (212°F) for thin-wall pet heat shrink for endoscope wiring. Hold the heat gun about 2-3 inches from the tubing. Move the heat source slowly along the length of the tubing. Rotate the device as you work. This helps the tubing shrink evenly and prevents air bubbles. Do not stay in one spot too long. Overheating can damage the tubing or wires.
Here is a step-by-step guide for this process:
Select the right tubing size and shrink ratio for your device. This prevents gaps and gives full coverage.
Clean the wires and smooth any sharp edges. This keeps the tubing from tearing.
Use a heat gun at about 150°C. Move slowly along the tubing for even shrinking.
Rotate the device during heating. This keeps the tubing aligned and smooth.
Inspect the tubing after shrinking. Check the diameter and wall thickness to make sure it meets quality standards.
Test the tubing for electrical insulation and sterilization resistance. This ensures the tubing works well in medical settings.
Uniform shrinking is important for medical devices. It keeps the wires safe and the device flexible. Good shrinking also helps the tubing last longer.
Quality Control Check | What to Look For |
|---|---|
Alignment | Tubing sits straight, no twisting |
Coverage | No gaps or exposed wires |
Smoothness | No wrinkles or bubbles |
Fit | Tubing hugs wires tightly |
Axial Tension Technique
For a smooth, tapered fit, gently pull the tubing along its length while you apply heat. Hold both ends of the tubing with tweezers or forceps. Pull just enough to keep the tubing straight, but not so hard that it stretches too much. This technique helps the tubing shrink evenly and follow the shape of the wire bundle. You get a low-profile finish, which is important for thin-wall pet heat shrink for endoscope wiring. The device stays slim and flexible, which is key for medical use.
Note: Practice the axial tension technique on scrap wires first. This helps you learn how much force to use.
Avoiding Common Mistakes
You can avoid many problems by following a few simple tips:
Do not use too much heat. High temperatures can melt or burn the tubing.
Do not rush. Move the heat gun slowly for even shrinking.
Always check the alignment before you start shrinking. Misaligned tubing can leave gaps or wrinkles.
Do not stretch the tubing too much. Too much tension can thin the wall and weaken the tubing.
Inspect your work. Look for bubbles, uneven shrinking, or exposed wires.
If you follow these steps, you will get a strong, flexible, and reliable finish. Your device will meet medical standards and work well in real-world use. Heat shrink tubing gives you the flexibility to protect wires in many types of devices. When you use pet heat shrink tubing the right way, you help your device last longer and stay safe for patients.
Inspect and Troubleshoot Heat Shrink Tubing
Check Uniformity
After you finish shrinking the tubing, you need to check if it looks even. Look at your device closely. The tubing should cover all wires without any gaps or wrinkles. Run your fingers along the tubing to feel for bumps or air pockets. If you see bubbles or folds, the tubing did not shrink right. Use a small flashlight to help you see better. Good uniformity helps your device work well and last longer.
Tip: Hold your device up to the light. If you see any thin spots or shadows, you may need to redo that section.
Test Integrity
You must test the strength of the tubing on your device. Gently bend and twist the wires. The tubing should stay tight and not slide or crack. Try pulling on the ends of the tubing. It should not move or tear. If your device will go through high-temperature sterilization, make sure the tubing does not melt or change shape. Some devices need gamma sterilization. PET heat shrink tubing can handle both types of sterilization. Always check the tubing after each cleaning cycle.
Test Type | What to Do | What to Look For |
|---|---|---|
Flex Test | Bend and twist wires | No cracks or splits |
Pull Test | Tug on tubing ends | No movement or tears |
Sterilization Test | Clean as required | No melting or warping |
Troubleshooting Issues
Sometimes, problems happen during shrinking. If you see bubbles, you may have trapped air. Use less heat and move the heat gun more slowly next time. If the tubing looks loose, you may have picked the wrong size. Always measure your device before cutting the tubing. If the tubing melts, the heat was too high. Lower the temperature for your next try. When you see cracks after sterilization, check if the tubing matches your device’s cleaning method.
Remember: Always use PET heat shrink tubing that matches your device’s needs. This helps your device stay safe and strong.
You can achieve a safe and reliable device by following each step in this guide. Start with clean wires and select the right tubing for your device. Use gentle heat to shrink the tubing and inspect your device for a smooth finish. Careful work helps your device last longer and perform well. Always follow safety rules to protect your device and the people who use it. For complex device needs, talk to an expert or look for more resources.
FAQ
How do you choose the right size PET heat shrink tubing?
You should pick tubing with an inner diameter about 25% larger than your wire bundle. This helps the tubing slide on easily and shrink tightly for a secure fit.
Can you use a regular hair dryer instead of a heat gun?
A hair dryer does not get hot enough for PET heat shrink tubing. You need a heat gun or hot-air torch to reach the correct shrinking temperature.
What should you do if the tubing wrinkles or bubbles?
If you see wrinkles or bubbles, use less heat and move the heat gun more slowly. Always check the tubing alignment before shrinking to prevent these issues.
Is PET heat shrink tubing safe for medical devices?
Yes, PET heat shrink tubing is safe for medical devices if it meets ISO 10993 and USP Class VI standards. Always check the product label for these certifications.
How do you test if the tubing is applied correctly?
Bend and twist the wires gently.
Tug on the tubing ends.
Check for cracks, splits, or movement.
If the tubing stays tight and smooth, you applied it correctly.

© Copyright 2024 My First Blog - All Rights Reserved.