Step-by-Step Guide to Using 0.5 mm Heat Shrink Tubing for Safe Wiring


You use 0.5 mm heat shrink tubing to cover and protect thin wires. This tubing creates a strong layer of insulation that keeps electricity safe. 0.5 mm heat shrink tubing fits tightly around small wires when you apply heat. You can prevent short circuits by using 0.5 mm heat shrink tubing in your projects. Always check your work after you place 0.5 mm heat shrink tubing to make sure you have a secure fit. Beginners and DIYers can handle 0.5 mm heat shrink tubing with a few simple tools and good safety habits.
Key Takeaways
Use 0.5 mm heat shrink tubing to keep thin wires safe from harm and short circuits. - Always measure and cut the tubing so it covers the bare wire well for a snug fit. - Use a heat gun to warm the tubing evenly so it shrinks tightly around the wire. - Check your work after it cools to make sure there are no open spaces or loose parts in the tubing. - Wear safety gear like gloves and glasses to keep yourself safe when using heat and electrical tools.
What Is 0.5 mm Heat Shrink Tubing?
Features and Benefits
You use 0.5 mm heat shrink tubing to cover thin wires. It shrinks when you heat it up. This makes a tight seal around the wire. The tubing gives a strong layer of protection. It keeps wires safe from water, dust, and damage. If you pick the right size, it fits well. It will not slip or leave open spots.
Manufacturers make heat shrink tubing from different materials. Each material has its own special features. You can see some common materials in the table below:
Material | Description |
|---|---|
Polyolefin | A heat shrinkable tubing that complies with environmental regulations, used for insulation. |
Silicone | Used for insulation, available in various colors, suitable for a range of applications. |
There are many types of heat shrink tubing. Some have thin walls and bend easily. Others have thick walls for more strength. The table below shows how wall thickness changes what the tubing does:
Wall Type | Thickness Range | Primary Applications | Key Benefits |
|---|---|---|---|
Thin-Wall | 0.2-0.5mm | Wire identification, light insulation | Flexibility, minimal space requirements |
Medium-Wall | 0.5-1.0mm | General wire protection, cable bundling | Balanced protection and flexibility |
Heavy-Wall | 1.0-2.5mm | Harsh environments, mechanical protection | Maximum durability and abrasion resistance |
You should know about shrink ratio too. For example, a 3:1 shrink ratio means the tubing gets three times smaller. This helps you get a tight fit. Here is a quick look:
Shrink Ratio | Inside Diameter (Pre-Shrunk) | Inside Diameter (Shrunk) |
|---|---|---|
3:1 | 1.5 mm (0.059 in) | 0.5 mm (0.02 in) |
Electrical Insulation Uses
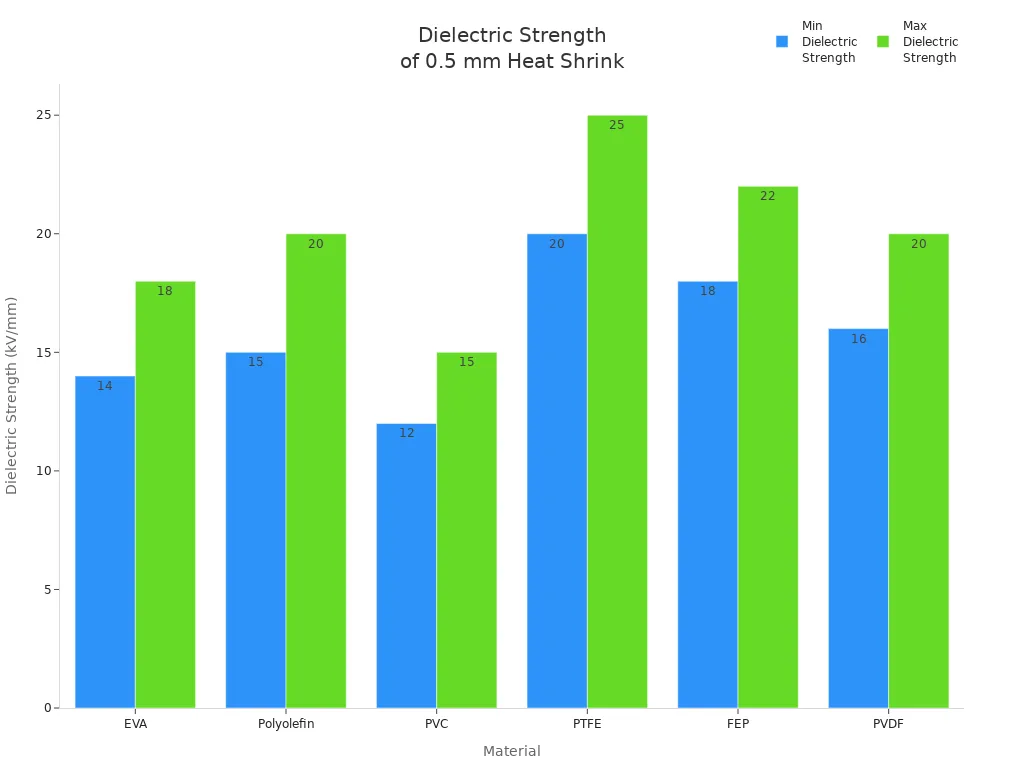
You use 0.5 mm heat shrink tubing for electrical insulation in many places. It keeps wires safe from short circuits and shocks. You can trust it with high voltage, depending on the material. For example, polyolefin can insulate up to 15-20 kV per millimeter. The chart below shows how different materials compare:
You will see this tubing in many industries. Here are some places where you might use it:
Industry |
|---|
Consumer Electronics |
Telecommunications |
Automotive |
Aerospace |
Medical Devices |
Chemical Processing |
You can pick from different types of heat shrink tubing for your project. Always choose the right size and material for your job. This helps your wiring last longer and stay safe.
Tools and Materials for Heat Shrink Tubing
Essential Tools
You need the right tools to work with 0.5 mm heat shrink tubing. These tools help you get a clean, safe result. You can see the most commonly recommended tools in the table below:
Tool Name | Description | Price |
|---|---|---|
Crimping Tool for Insulated Electrical Wire Connectors | Suitable for AWG 22-10 | $23.99 |
Crimping Tool for Non-Insulated Terminal | Suitable for AWG 22-6 | $23.99 |
Mini Heat Gun 350W | Ideal for applying heat shrink tubing | $20.99 |
You use a crimping tool to attach connectors to your wires. This tool gives you a strong, reliable connection. You use a mini heat gun to shrink the tubing. The heat gun gives you control over the temperature. You should not use an open flame unless you have special training and the tubing is flame-resistant.
The temperature you use matters a lot. If you use the right heat, the tubing shrinks evenly and fits tightly. The table below shows what happens at different temperatures:
Temperature (°C) | Description |
|---|---|
88 | Onset of shrinkage for heat shrink tubing. |
125 | Complete shrinkage temperature as specified by the manufacturer. |
You should start heating at 88°C. The tubing will begin to shrink. At 125°C, the tubing will reach its final size. You should move the heat gun slowly and evenly for the best results.
Tip: Always measure your tubing before you cut it. You want enough length to cover the exposed wire and a little extra for a secure seal.
Safety Gear
You must protect yourself when working with heat and electrical tools. The right safety gear keeps you safe from burns and injuries. Here is what you should use:
Wear heat-resistant gloves to prevent burns when handling tubing.
Use safety glasses to protect your eyes from heat, sparks, or flying debris.
Utilize a heat gun or specialized shrink tool with temperature control for heating.
Avoid open flames unless the tubing is flame-resistant and you are trained.
You should always work in a well-ventilated area. Keep your workspace clean and free of clutter. If you follow these steps, you can work safely and get a professional result every time.
How to Use Heat Shrink Tubing for Electrical Insulation
Measure and Cut Tubing
You start by measuring the length of heat shrink tubing you need. Make sure the tubing covers the exposed part of the wire and extends a little past each end. This extra length helps create a strong seal. Use sharp scissors or a wire cutter to cut the tubing. A clean cut prevents fraying and makes it easier to slide the tubing onto the wire.
Tip: Always measure before you cut. If the tubing is too short, it will not protect the wire. If it is too long, it may bunch up or interfere with other components.
Clean and Prepare Wires
Before you connect cables, clean the wires. Remove any dirt, oil, or old insulation. You can use a soft cloth or a small brush. Clean wires help the tubing stick better and make the electrical connections safer. If you need to strip the wire, use a wire stripper. Do not nick or damage the wire strands. Damaged wires can cause weak spots in your electrical insulation.
Slide and Center Tubing
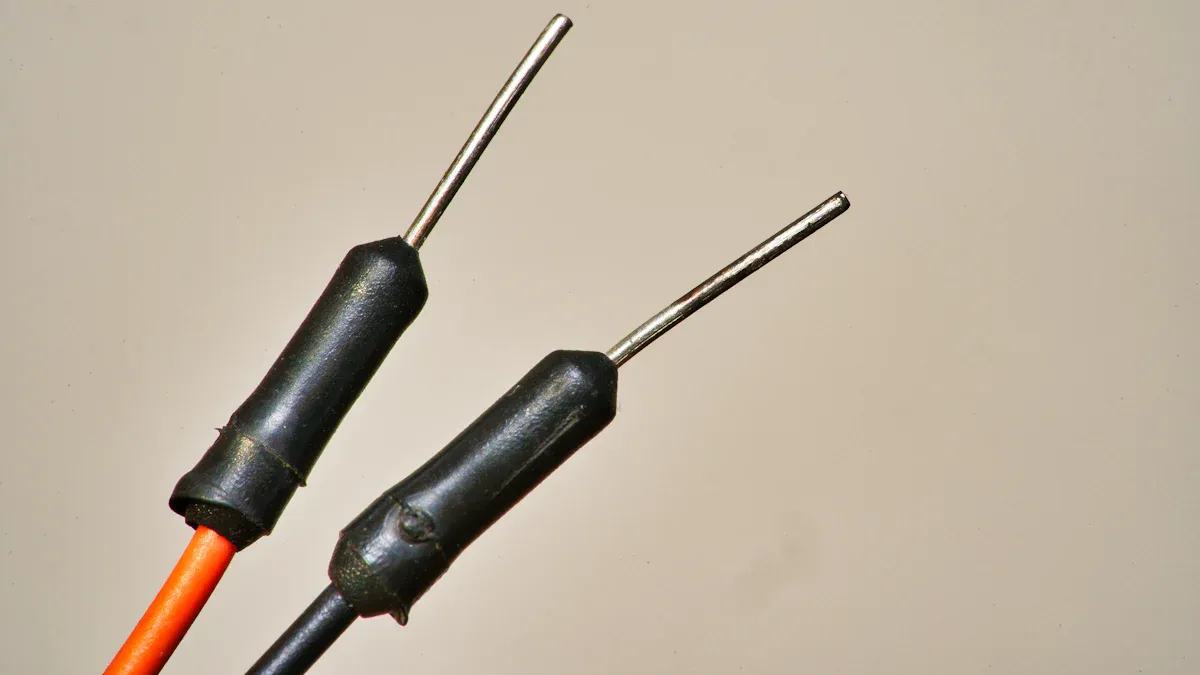
After you prepare the wires, slide the heat shrink tubing over one end. Move the tubing so it sits in the middle of the area you want to cover. You must position the tubing accurately over the wire joint to ensure proper coverage. Centering the tubing is important for a tight seal.
Make sure the tubing covers the entire joint or exposed wire.
Leave equal amounts of tubing on both sides of the joint.
Double-check the position before you apply heat.
If you misalign the tubing, you risk poor insulation. Misalignment can create non-uniform electric fields. This can speed up aging and increase the chance of insulation failure. Localized heating from misalignment can also damage the tubing and wires.
Apply Heat Evenly
Now you apply heat shrink tubing using a heat gun. Set the heat gun to the right temperature. The best range for shrinking 0.5 mm heat shrink tubing is between -55°C to +125°C. This range works for most materials like polyolefin. Using the correct temperature helps you shrink the tubing without harming the wires.
Follow these steps for even heating:
Use a heat gun for precise temperature control.
Start heating at one end of the tubing.
Move the heat gun in a slow, circular motion to ensure uniform shrinkage.
If you see lumps, uneven wall thickness, or incomplete shrinking, you may have applied heat unevenly. Deformation of the tubing is another sign. Uneven heating can lead to weak spots and poor protection for your electrical connections.
Note: Do not use an open flame unless you have special training and the tubing is flame-resistant.
Cool and Inspect
Let the tubing cool completely before you touch or inspect it. Handling the tubing while it is still hot can make it brittle or cause it to lose its shape. Cooling is important for a strong and lasting seal.
After the tubing cools, check your work:
Look for uniform shrinkage along the tubing.
Make sure there are no gaps or air pockets.
Check that the tubing fits tightly and does not move.
A good inspection helps you spot problems early. This step ensures your application process is safe and effective. You can now connect cables with confidence, knowing your heat shrink tubing provides solid electrical insulation. If you need to bundle wires, repeat these steps for each connection.
Tip: Always inspect your work before you finish your project. Careful inspection prevents future problems and keeps your wiring safe.
Troubleshooting and Safety Tips
Common Problems
You might face a few issues when working with heat shrink tubing. Sometimes, the tubing splits, leaves gaps, or does not shrink as expected. These problems can affect how well your wiring stays insulated and how well you are protecting against moisture. You can use different methods to fix these issues. The table below shows some solutions you can try:
Method | Description |
|---|---|
Heat Shrink Tape | Wrap this tape tightly around the area before applying heat. It does not shrink as much as tubing. |
Self-Vulcanizing Tape | This tape melts and fuses together. You can slice it into thinner strips if it is too wide. |
Splitting Tubing | Split the tubing and use it as a wrap. Squeeze it tight after heating to help it stick. |
Heat Shrink with Adhesive | Use tubing that contains hot melt adhesive for better grip when used as a spiral wrap. |
Liquid Tape | Brush or dab this on the wire. Use caution, as it may not work as well as other methods. |
If you see gaps or the tubing does not shrink evenly, check your heat source. Make sure you use the right temperature and keep the heat gun moving. Always choose tubing that matches the wire size and shrink ratio.
Safety Precautions
You must stay safe when using heat shrink tubing. Heat guns and open flames can cause burns or fires if you do not follow best practices for using heat shrink tubing. Here are some important safety tips:
Wear heat-resistant gloves and safety glasses.
Keep your workspace clear of flammable materials.
Use a heat-resistant mat for resting your heat gun.
Preheat the heat gun before you start shrinking.
Move the heat gun slowly to prevent scorching.
Choose tubing with the correct shrink ratio and temperature rating.
Allow the tubing to cool before you touch it.
You should always inspect your work after you finish. Look for even coverage and make sure the tubing fits tightly. If you follow these steps, you will get safe and reliable results every time.
Tip: Keep a fire extinguisher nearby when working with heat sources. Good preparation helps you avoid accidents.
You can make wiring safe if you follow these steps: First, get all your materials ready. Next, measure and cut the tubing to the right size. Then, slide the tubing over the wire and heat it slowly and evenly. Last, look at your work to see if there are any gaps or loose spots.
Getting ready and checking your work helps your insulation last longer. It also stops electrical problems from happening.
Always look for shrinkage, wires that are showing, and test if the tubing bends well.
If you want to know more, you can look at advanced tubing choices:
Feature | Description |
|---|---|
Higher Shrink Ratios | Gives a better fit and covers tricky wiring jobs. |
Applications | Good for cars, planes, and boats. |
FAQ
How do you choose the right size of heat shrink tubing for a connection?
You should select tubing with an internal diameter about twice the size of your wire or connection before shrinking. This ensures a snug fit after heating. Always check the manufacturer's specifications for the best match.
Can you use a lighter instead of a heat gun for shrinking tubing on a connection?
You can use a lighter, but it is not recommended. A heat gun gives you better control and prevents damage to the connection. Using a lighter may overheat or burn the tubing, which can weaken your connection.
What should you do if the tubing does not fully shrink around your connection?
If the tubing does not shrink, check your heat source. Make sure you apply enough heat evenly around the connection. If the tubing still does not fit, you may need a different size or material for your connection.
Is it safe to use heat shrink tubing for every electrical connection?
You can use heat shrink tubing for most low-voltage electrical connections. For high-voltage or critical connections, always check safety standards. Some connections may need extra insulation or special tubing types.
How do you inspect a finished connection with heat shrink tubing?
After cooling, look for tight coverage and no gaps around the connection. Gently tug the tubing to check if it stays in place. A good connection will have smooth, even tubing with no exposed wire.
See Also
How to Select the Perfect Size for Heat Shrink Tubing
Key Advice for Effectively Utilizing FEP Heat Shrink Tubing
Applications of Heat Shrink Tubing for Electrical Wire Insulation
Important Information Regarding PET Heat Shrink Tubing in Electronics

© Copyright 2024 My First Blog - All Rights Reserved.